Wednesday, November 17, 2010

How To Install and Configure EMC Fast Cache on a Clariion

How to install and configure EMC Fast Cache on a Clariion

The first step is to make sure you are using Unisphere and are on Flare 30. Without flare 30 none of these steps are possible.

Then connect your EFD disks, for me it was 5 100 gig flash disks, which will build 2 raid 1 mirrors and 1 hotspare providing us 200 gigs of fast cache.

Once your fast software arrives you will receive it on cds. Each cd contains a .ena file which you will need to copy from the cd into a folder on the computer that you will be using unisphere service manager. My default location that I had to copy the software to was C:\EMC\repository\Downloads

Then from inside Unisphere click on Launch USM under Service Tasks


emc support told me to just select all 4 disk as raid 1, and behind the scenes it will create 2 raid 1 mirrors.

this next screen may give you a scare, it did for me and I called support. It should only disable SP cache for a few seconds/minutes as it rebuilds the memory map on the ram to include the SSD disks. For me it only took about 2 minutes in total and didn't appear to impact performance.


Now you should see that it is enabled, and you also need to assign a hotspare

select manual and select the SSD disk as the hotspare

now go to the properties of the LUN that you want to enable fast cache on, and check fast cache, the enable caching should also automatically check itself off, hit apply and sit back and let fast cache do the work for you.


You can use navi analyzer to view Fast cache statistics to ensure that it is working properly.

Thursday, September 23, 2010

Set time on Recoverpoint

How to view the time of your RPA
SSH into your RPA (as a user, not boxmgmt)
type set_time_display
select 1 for local
type get_current_time
If the time is off do the following to set it

How to set NTP server
For RecoverPoint versions 3.1 and later:
Use NTP menu option from the boxmgmt menu.
Make a list of all Consistency Groups (CG). Take note on which RPA each CG is running.
Note! This is an extremely important step as the information will be used to restore Consistency Groups.
Take note and record your site’s NTP server IP address.

Connect to the RPA GUI and move all groups off the RPA you wish to correct the NTP time.

Login as boxmgmt user to problem RPA.

[2] Setup
[8] Advanced options
[13] Set time via NTP or [9] Set time via NTP

Perform the same steps if needed on other RPAs ensuring that the consistency groups are moved off the RPA before applying the setting.

Re-balance the Consistency Groups across RPA's as per step 1.

Make sure the time on your RPA is correct
SSH into your RPA (as a user, not boxmgmt)
type set_time_display
select 1 for local
type get_current_time
repeat for each RPA in your environment

Thursday, August 26, 2010

San Policy Server 2008 enterprise and advanced

Windows server 2008 (enterprise and datacenter) has introduced a new default disk policy that causes a long delay to boot a server while using SRM to bring our servers online. The SAN policy determines whether a newly discovered disk is brought online or remains offline, and whether it is made read/write or remains read-only. The default setting of forcing all SAN disks to remain offline the first time a disk is discovered can cause applications like Exchange and SQL to take a very long time to fail which in turn will cause the server a very long time to get to a login prompt.

In order to reduce the time it takes to bring our production environment online I had to change this setting from the default of offline to online on our production server. Recoverpoint replicates these changes to our DR site and now SRM is able to bring the server online quicker and get applications online quicker. In the past, the server would take a very long time to come online because services such as Exchange and SQL would take a very long time to bomb out before we were able to login to the server, online the disk and reboot again.

Here are the steps to check to see what your current setting is:
open up a command prompt
type diskpart
type san
if it is currently says SAN Policy : Offline Shared
then you will need to type the following to resolve this
SAN POLICY=OnlineAll

You may also want to add this into your unattended build or into your vmware templates etc to ensure that you don't run into this again in the future.

Wednesday, May 19, 2010

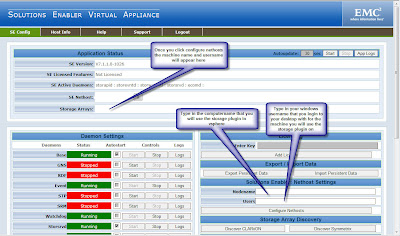
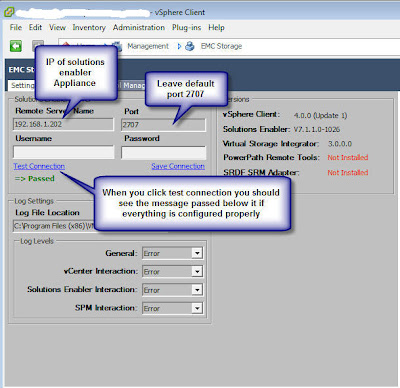
How to install and configure the EMC storage Plugin with Vsphere using the Solutions Enabler Appliance

1. download the solutions enabler appliance from powerlink

2. login to the appliance with the username seconfig and set the IP and password

3. on the desktop that you use your vsphere client, install the VSI plugin from powerlink

4. on the desktop install the solutions enabler x32 version (even if 64 bit desktop, vsphere client is 32 bit so SE must match)

5. open dos and type the following set SYMCLI_CONNECT=SYMAPI_SERVER

6. from dos type the following set SYMCLI_CONNECT_TYPE=remote

7. C:\Program Files\EMC\SYMAPI\config\netcnfg and add the following line at the end SYMAPI_SERVER - TCPIP DNS_NAME_OF_APPLIANCE IP_OF_APPLIANCE 2707 ANY

8. Point a web browser to the solutions enabler appliance https://IP_of_appliance:5480

9. under nethost settings type in the workstation name that you will be using the vsphere client from as well as the username that you log into your workstation with. (in our case we use different logins to the vi console, however you must set the user to the user you login to windows with)


The error that I kept getting from the emc storage plugin when I put in the remote server name and port, and then clicked test connection was “Failed: The trusted host file disallowed a client server connection.” There were two reasons for this:
1. I was unaware that I had to install solutions enabler on the desktop, I thought that the appliance would do the trick.

2. I had the nethost configured incorrectly, I had my account that I logged into vsphere with however it had to be the account that I logged into windows with.

Wednesday, May 12, 2010

EMC VPLEX

I am here at EMC world and I have finally grasped the concept of VPLEX after attending the 2 hour Vplex hands on lab. VPLEX is the big buzz here at EMC world and to make it simple to understand, it is virtual raid that can go beyond the datacenter as well as also being storage agnostic. You simply carve up storage and present it to the vplex, the vplex then will claim storage from the backend and it will present it to your servers. You will claim storage from one SAN, claim storage from a different san (it could be in the same data center or at another data center within synchronous distance) and then you raid the storage together. When you svmotion a server between storage and even sites, the data is already there so it looks like it moves from site to site within seconds.

Some of the key points are:
It is active/active, very resilient
It can support 8000 virtual volumes per vplex cluster
the maximum lun size tested by EMC is 32 TB
They recommend using 8 gig fiber between vplex devices
It can support a maximum of 5 ms latency
the easiest migration path is through SVMotion (assuming you are fully virtual, like me)

Tuesday, May 11, 2010

Recoverpoint CAN corrupt your production data

I had to expand a production lun, and of course when you expand a lun that is replicated by recoverpoint you also need to expand the CDP replica volume as well as the CRR replica volume if you are using CRR and CDP. I followed the steps listed in priumus article emc148277, however the steps listed aren't correct, you can't destroy the CG and then detach the luns from the splitters. If you try to build a new CG at this point, recoverpoint will still see the original size of each lun, not recognizing that the lun has been expanded. What you need to do at this point is to reboot your RPA's all at the same time to flush the cache.

What I did (which they have now noted as a bug in the primus article, and they also now warn you NOT to do this thanks to my discovery) was removed the luns from the storage group in Navisphere. When i added the luns back to the storage group, i was then able to see the correct size in recoverpoint. A few hours later my exchange lun disappeared from the VM guest after it slowly started getting corrupted as shown in the windows event logs. The recoverpoint appliance mixed up the production lun with the CDP replica volume and started writing the replica directly on top of the production lun. BE VERY CAREFUL, and pay close attention to the notes that they have added to the primus article so that no one experiences the same issues that I had!

This is resolved in RecoverPoint 3.1.4 (3.1 SP4) and 3.2.3 (3.2 SP3).
See primus emc223955

Remove CDP or CRR from Recoverpoint

This seems like a simple task however since I always err on the side of caution I dug around on powerlink on the correct procedure to remove either CDP or CRR from a recoverpoint consistency group. After my search came up empty, I called EMC support and they stated that it is safe to just remove either CRR or CDP without any issues and here is how you can do it.


Monday, March 1, 2010

Good monitoring/alerting solution for san storage and vmware

One thing that our current monitoring solution solar winds orion was lacking was vmware and storage reporting. Solarwinds decided to fix this issue by acquiring a company called tek-tools. Right now they are two separate products however in the near future they will be fully integrated into a single pane of glass.

Below are some screenshots of the tek-tools product and they are pretty self explanitory. It can monitor and alert on the following, esx host cpu/memory/disk space etc, esx guest cpu/memory/disk space, datastore useage, datastore forecasting, san lun performance, just to name a few. Another thing that I am very pleased with the graphical information it can show me in my EMC Clarrion SAN (one thing navisphere reporting can't provide you with). This seems to do an excellent job of completing the circle for monitoring of your virtual environment and san storage, and once integrated into orion it will provide full monitoring of everything in your environment!


Thursday, February 4, 2010

Attach RDM to vsphere with Recoverpoint

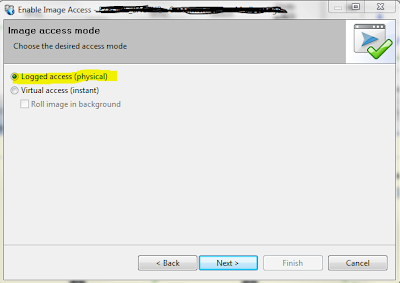
If you need to attach a recoverpoint volume to a guest through RDM you MUST select physical access in recoverpoint if you don't want to shut down the guest. If you select virtual access you must power down the guest and then attach the disk.

1. enable physical access in recoverpoint
2. ensure that your esx hosts can see this lun by verifying in navisphere storage groups
3. rescan datastore
4. edit properties of the guest and add a physical disk, if you did everything correctly attach RDM should be available.
5. Select a drive letter on the windows server for this disk.