Wednesday, May 30, 2012

Problem with VMWare view v5 and Vsphere hardware v8

I have been working with EMC support for a few months now trying to figure out a strange issue that we have been having. Our vmware View v5 windows 7 x64 desktops have been experiencing sporadic and strange issues. Sometimes the dual monitors will drop to a single monitor and the resolution on that one monitor will drop from 1680 x 1050 to 1024 x 768. The quick fix is to disconnect from the session and reconnect. Setting a screensaver to lock, or UAC popups have cause this issue to surface as well, however many times is just randomly happens.

Vmware Support has identified the issue and they said for now to stick to hardware v7 and the vm tools associated with that version in order to avoid this situation.

In summary, if you are using Vmware View 5 on Vsphere, do NOT upgrade your virtual hardware to v8 until this issue has been resolved.


------------UPDATE---------------------------------
If you did upgrade to V8 already, here are the steps provided by VMWare support to roll back to hardware V7.

Downgrading the virtual machine hardware version:

http://kb.vmware.com/kb/1028019

VMware vCenter Converter Standalone 5.0

Document: https://www.vmware.com/pdf/convsa_50_guide.pdf

Download link: https://my.vmware.com/web/vmware/info/slug/infrastructure_operations_management/vmware_vcenter_converter_standalone/5_0

The external link below can be referenced, the outlined steps can be used, but, ensure that you are selecting Virtual Hardware version 7.

- Once the VM has been converted (virtual to virtual aka V2V), please uninstall VMware tools & View Agent

- Power off VM and then power back on

- Install VMware tools first reboot and then View agent

- Power off the VM and then power on.

http://www.techhead.co.uk/vmware-esx-how-to-downgrade-a-vms-vm-versionhw-level-from-7-4-0-to-4-3-x

Friday, March 16, 2012

How to update firmware on a wyse R90x


I downloaded the latest version of the wyse USB imaging tool, v 1.15, ran the tool, formatted an 8 gig thumb drive, pointed it to the .rsp file for the R90, and then connected it to the wyse terminal. I powered on the wyse terminal, hit P a few times, selected the thumb drive to boot to, and it would hang up on a black dos screen with a flashing cursor. I tried this several times just in case I was doing something incorrectly and each time I ended up stuck at the same screen. After scouring the web I finally came across a posting from someone who ran into a similar problem, the USB tool does not seem to work if you run it from a windows 7 computer. As the message board suggested, I tried from a windows XP computer and immediately the problem was solved!

Thanks for the post MrAdam
http://community.spiceworks.com/topic/165561-wyse-usb-firmware-updater-thingy-pain-in-the-butt-deal

Wyse clearly states that win7 is supported in their guide, however clearly it is not.
https://appservices.wyse.com/supportdownload/WDM/USB_Firmware_Tool_1.15_Users_Guide_SEP2011.pdf

It seems like I will have to keep an old XP computer lying around for years to come!

Wednesday, February 1, 2012

Vmware Vsphere Host(s) suddenly show as disconnected


I had an issue where my vsphere hosts would suddenly appear as disconnected in vcenter.  I am running vsphere 5 esxi on cisco C200-m2 servers.  Every guest that was running on that host would show as disconnected as well.  This was a ticking time bomb, because if I left it in this scenario the guests would eventually crash and the host would stop responding all together as well.  The heavier the load on the server the quicker this would occur.  In my environment I have 5 servers, and with an even load, my server would crash approximately every 5-7 days, and each time it was a different host.  When I put 2 in maintenance mode to do some troubleshooting it crashed in <36 hours.  This was a really painful issue because I would have to run around the floor letting users know to save their work as I would have to run a power cycle from the remote access card which would hard crash all of the desktops and servers running on this server.  Keep in mind that I am 99% virtual here, desktops and servers, so this was very painful.  The only way I was aware that there was an issuu was by seeing the disconnected state while in vcenter, or if a user rebooted their vdi it wouldn’t come back online, or the guests would eventually crash triggering an alert.  The monitors that we have in place were unable to detect this scenario to lete me know that it was in this zombie state.  Vmware and cisco worked on this issue for a few weeks, cisco pointed me to the following KB from vmware three weeks ago, http://kb.vmware.com/selfservice/microsites/search.do?language=en_US&cmd=displayKC&externalId=1030265

I followed the powercli method (must have missed the console method by accident) and the issue still occurred.  After a few weeks of working with vmware it was determined that the powercli method was written incorrectly and the console method was written correctly.  After running the console method the problem has been resolved, and vmware also just updated the article to correct the powercli method.

Vmware view client not connecting for home users

Vmware view 5 client and Norton internet security

I had a few users who had difficulty connecting to vmware view from their home pc. They were running windows 7, and after it installed they could launch the client, then they could type in their username and RSA passcode, and then after hitting connect the vmware view client would just disappear. After digging around I suspected that Norton internet security was getting in the way. Instead of poking the appropriate hole, I just disabled it first, and after successfully connecting to vmware view, I decided to uninstall the program. I typical use the free Microsoft security essentials which did properly allow view to connect. I don’t see any kb’s out there yet that reference this as an issue, and I am sure someone can find the correct hole to poke to make it work, however to me it looked like it was setup properly and allowing vmware view access yet it wasn’t working.

Friday, January 13, 2012

wyse p20 login to windows kicks back out to login screen

I had users who had problems logging into their view desktops while using p20 wyse devices and vmware view 5. After typing in their username and password it would make the sounds for windows login, sometimes flash the login screen, the monitors would go black, and then it would kick them back out to the login screen. Before I figured out what was going on I found out that restarting their computer would solve the problem. After digging around on the internet, I found a few posts that mentioned this may be isolated to teradicci clients (p20) however when the windows desktop was setting the monitors to sleep (default 15 min) the view login was not able to wake them back up properly.

In order to resolve this create a COMPUTER gpo that sets the monitors to never sleep for all windows desktops that are using this type of setup.

Slow Windows 7 Desktops on View 5 vsphere 5 hardware v8

After updating my windows 7 desktops to vsphere hardware version 8 (v8) all of my users began to complain of VERY slow activity in windows including delays in typing, delays in dragging windows around, and overall general responsiveness. VMware support passed along an INTERNAL KB that explains how to fix this issue, which did solve the issue for me.The following workaround has been verified where you will need to make changes to the .vmx file (the VM's configuration file.)

1. Verify that SSH remote access is enabled in the Security Profile of the ESXi host 2. Connect to the ESXi host with an SSH client with the root account 3. Once logged in, change to the path of the virtual machine folder (for example: cd /vmfs/volumes/Storage1/vmname/ ) 4. In this directory, you should find the VM's configuration file with the .vmx extension.
5. Use vi to open and edit the vmx (example, vi vmname.vmx) 6. Add the following line at the end of the .vmx file:

mks.poll.headlessRates = "1000 100 2"

7. After making the change on the .vmx file, you will need to completely power off the VM, and power it back on so that it re-reads the .vmx (a restart within the OS level will not re-read the .vmx file)

Additional steps will be needed if this applies to linked clones. You will still need to follow steps 1-6 above on the parent VM's .vmx file.

7B. Power down the parent VM
8. Take a new snapshot
9. Recompose the pool to the new snapshot

After the recompose is complete, the changes made should now be applied to the linked-clones.

Thursday, January 5, 2012

Vmware view 5 and Wyse P20

Add a disconnect icon for all users in a vmware view environment

I am using view 5 on wyse p20’s and I needed the ability for my users to disconnect from their desktop for receptionists who rotate desks, and for users connecting from home. View 5 seems to have a few issues allowing a user to connect from the p20 or from home is a session is already connected. After several attempts the user can usually get into the session, however I have noticed solid black screens after logging in and quick disconnects from the p20 if it can’t display the windows desktop properly.

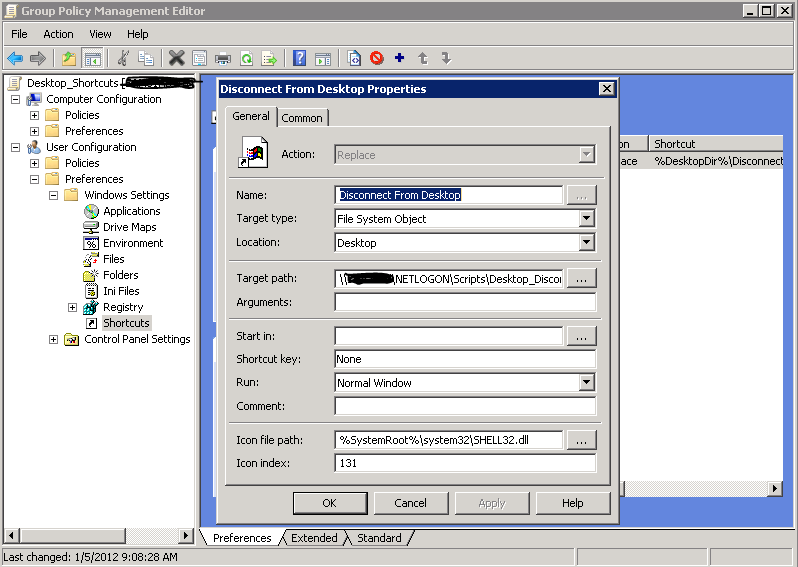
As a fix I decided to deploy a disconnect icon to all users through active directory. Here are the steps that I took
1. First create a disconnect batch script in your netlogon share (or somewhere else all users can access)
a. The only line you need in the batch file is:
%systemroot%\system32\tsdiscon.exe
2. Then create a group policy in AD and apply to your employee user OU

3. I selected icon 131 which was a red X, however feel free to select any icon of your choice. A full listing of icons and their associated number is found at http://dl.dropbox.com/u/5036238/Win%207%20shell32.dll%20icons.jpg
4. You can either run gpupdate /force to see if it works, or logoff and log back on.
5. Inform your users that this is the best option to use when finished for the day or finished with their remote connection. Also make them aware that this will not close anything on their desktop, it will keep all programs and documents open until they connect again.

Wednesday, January 19, 2011

VAAI in Vsphere 4.1 is turned on by default and can break your recoverpoint constancy groups!

Beware, VAAI in Vsphere 4.1 is turned on by default and can break your recoverpoint constancy groups!

UPDATE: Scott Lowe just wrote me back and confirmed that the version of flare code that will resolve this issue is 4.30.000.5.509

We recently had a problem where our Exchange Consistency groups in recoverpoint were all stuck at initializing 0% for several days out of the blue after running for over a year. I tried to force a re-sweep, I tried to rebuild the Constancy groups, however it was still stuck at 0% initialized. The fix from EMC support was to disable VAAI in vmware, steps are below.
We are using the following:
Vsphere 4.1
Flare 30 4.30.000.5.507
Recoverpoint 3.3 SP1
And Clariion Splitters

EMC Case Notes:
Notes: I send the customer a email asking if VAAI is on?
Just got a update from engineering stating that this is a know issue.
This case was closed and defined as a bug

From EMC Primus Article emc255099
ESX/ESXi 4.1 VAAI (vStorage APIs for Array Integration) - Hardware Acceleration features (Locking , Pre-zero, Copy) are only supported with RecoverPoint 3.3 SP1 and up that uses CLARiiON FLARE 30 type 2 patch and up and a CLARiiON splitter.

From EMC Recoverpoint Replicating Vmware on page 31:
vSphere 4.1 introduces vStorage API for Array Integration (VAAI). By
default, VAAI commands are enabled upon installation. If your
release of the RecoverPoint splitter does not support a VAAI
command, that command must be disabled in all ESX servers. Failure
to disable an unsupported VAAI command can cause data
corruption, production data being unavailable to ESX hosts,
degraded performance, and switch reboots.
For RecoverPoint support of VAAI commands, refer to Table 3 on
page 7. Use the following procedure to disable VAAI commands that
are not supported by your configuration.
To disable VAAI commands:
1. In the vSphere client inventory panel, select the host.
2. Click the Configuration tab and from the Software menu, select
Advanced Settings.
3. To disable Hardware-Assisted Locking, click VMFS3, and set the
value of VMFS3.HardwareAcceleratedLocking to 0.
4. To disable Full Copy, click DataMover, and set the value of
DataMover.AcceleratedMove to 0.
5. To disable BlockZeroing, click DataMover, and set the value of
DataMover.AcceleratedInit to 0.
6. To save the changes, click OK.
32 EMC RecoverPoint Replicating VMware
Management tasks and procedures
7. Make sure every unsupported command on every replicated ESX
Server is disabled.

Wednesday, November 17, 2010

How To Install and Configure EMC Fast Cache on a Clariion

How to install and configure EMC Fast Cache on a Clariion

The first step is to make sure you are using Unisphere and are on Flare 30. Without flare 30 none of these steps are possible.

Then connect your EFD disks, for me it was 5 100 gig flash disks, which will build 2 raid 1 mirrors and 1 hotspare providing us 200 gigs of fast cache.

Once your fast software arrives you will receive it on cds. Each cd contains a .ena file which you will need to copy from the cd into a folder on the computer that you will be using unisphere service manager. My default location that I had to copy the software to was C:\EMC\repository\Downloads

Then from inside Unisphere click on Launch USM under Service Tasks


emc support told me to just select all 4 disk as raid 1, and behind the scenes it will create 2 raid 1 mirrors.

this next screen may give you a scare, it did for me and I called support. It should only disable SP cache for a few seconds/minutes as it rebuilds the memory map on the ram to include the SSD disks. For me it only took about 2 minutes in total and didn't appear to impact performance.


Now you should see that it is enabled, and you also need to assign a hotspare

select manual and select the SSD disk as the hotspare

now go to the properties of the LUN that you want to enable fast cache on, and check fast cache, the enable caching should also automatically check itself off, hit apply and sit back and let fast cache do the work for you.


You can use navi analyzer to view Fast cache statistics to ensure that it is working properly.

Thursday, September 23, 2010

Set time on Recoverpoint

How to view the time of your RPA
SSH into your RPA (as a user, not boxmgmt)
type set_time_display
select 1 for local
type get_current_time
If the time is off do the following to set it

How to set NTP server
For RecoverPoint versions 3.1 and later:
Use NTP menu option from the boxmgmt menu.
Make a list of all Consistency Groups (CG). Take note on which RPA each CG is running.
Note! This is an extremely important step as the information will be used to restore Consistency Groups.
Take note and record your site’s NTP server IP address.

Connect to the RPA GUI and move all groups off the RPA you wish to correct the NTP time.

Login as boxmgmt user to problem RPA.

[2] Setup
[8] Advanced options
[13] Set time via NTP or [9] Set time via NTP

Perform the same steps if needed on other RPAs ensuring that the consistency groups are moved off the RPA before applying the setting.

Re-balance the Consistency Groups across RPA's as per step 1.

Make sure the time on your RPA is correct
SSH into your RPA (as a user, not boxmgmt)
type set_time_display
select 1 for local
type get_current_time
repeat for each RPA in your environment

Thursday, August 26, 2010

San Policy Server 2008 enterprise and advanced

Windows server 2008 (enterprise and datacenter) has introduced a new default disk policy that causes a long delay to boot a server while using SRM to bring our servers online. The SAN policy determines whether a newly discovered disk is brought online or remains offline, and whether it is made read/write or remains read-only. The default setting of forcing all SAN disks to remain offline the first time a disk is discovered can cause applications like Exchange and SQL to take a very long time to fail which in turn will cause the server a very long time to get to a login prompt.

In order to reduce the time it takes to bring our production environment online I had to change this setting from the default of offline to online on our production server. Recoverpoint replicates these changes to our DR site and now SRM is able to bring the server online quicker and get applications online quicker. In the past, the server would take a very long time to come online because services such as Exchange and SQL would take a very long time to bomb out before we were able to login to the server, online the disk and reboot again.

Here are the steps to check to see what your current setting is:
open up a command prompt
type diskpart
type san
if it is currently says SAN Policy : Offline Shared
then you will need to type the following to resolve this
SAN POLICY=OnlineAll

You may also want to add this into your unattended build or into your vmware templates etc to ensure that you don't run into this again in the future.

Wednesday, May 19, 2010

How to install and configure the EMC storage Plugin with Vsphere using the Solutions Enabler Appliance

1. download the solutions enabler appliance from powerlink

2. login to the appliance with the username seconfig and set the IP and password

3. on the desktop that you use your vsphere client, install the VSI plugin from powerlink

4. on the desktop install the solutions enabler x32 version (even if 64 bit desktop, vsphere client is 32 bit so SE must match)

5. open dos and type the following set SYMCLI_CONNECT=SYMAPI_SERVER

6. from dos type the following set SYMCLI_CONNECT_TYPE=remote

7. C:\Program Files\EMC\SYMAPI\config\netcnfg and add the following line at the end SYMAPI_SERVER - TCPIP DNS_NAME_OF_APPLIANCE IP_OF_APPLIANCE 2707 ANY

8. Point a web browser to the solutions enabler appliance https://IP_of_appliance:5480

9. under nethost settings type in the workstation name that you will be using the vsphere client from as well as the username that you log into your workstation with. (in our case we use different logins to the vi console, however you must set the user to the user you login to windows with)


The error that I kept getting from the emc storage plugin when I put in the remote server name and port, and then clicked test connection was “Failed: The trusted host file disallowed a client server connection.” There were two reasons for this:
1. I was unaware that I had to install solutions enabler on the desktop, I thought that the appliance would do the trick.

2. I had the nethost configured incorrectly, I had my account that I logged into vsphere with however it had to be the account that I logged into windows with.

Wednesday, May 12, 2010

EMC VPLEX

I am here at EMC world and I have finally grasped the concept of VPLEX after attending the 2 hour Vplex hands on lab. VPLEX is the big buzz here at EMC world and to make it simple to understand, it is virtual raid that can go beyond the datacenter as well as also being storage agnostic. You simply carve up storage and present it to the vplex, the vplex then will claim storage from the backend and it will present it to your servers. You will claim storage from one SAN, claim storage from a different san (it could be in the same data center or at another data center within synchronous distance) and then you raid the storage together. When you svmotion a server between storage and even sites, the data is already there so it looks like it moves from site to site within seconds.

Some of the key points are:
It is active/active, very resilient
It can support 8000 virtual volumes per vplex cluster
the maximum lun size tested by EMC is 32 TB
They recommend using 8 gig fiber between vplex devices
It can support a maximum of 5 ms latency
the easiest migration path is through SVMotion (assuming you are fully virtual, like me)

Tuesday, May 11, 2010

Recoverpoint CAN corrupt your production data

I had to expand a production lun, and of course when you expand a lun that is replicated by recoverpoint you also need to expand the CDP replica volume as well as the CRR replica volume if you are using CRR and CDP. I followed the steps listed in priumus article emc148277, however the steps listed aren't correct, you can't destroy the CG and then detach the luns from the splitters. If you try to build a new CG at this point, recoverpoint will still see the original size of each lun, not recognizing that the lun has been expanded. What you need to do at this point is to reboot your RPA's all at the same time to flush the cache.

What I did (which they have now noted as a bug in the primus article, and they also now warn you NOT to do this thanks to my discovery) was removed the luns from the storage group in Navisphere. When i added the luns back to the storage group, i was then able to see the correct size in recoverpoint. A few hours later my exchange lun disappeared from the VM guest after it slowly started getting corrupted as shown in the windows event logs. The recoverpoint appliance mixed up the production lun with the CDP replica volume and started writing the replica directly on top of the production lun. BE VERY CAREFUL, and pay close attention to the notes that they have added to the primus article so that no one experiences the same issues that I had!

This is resolved in RecoverPoint 3.1.4 (3.1 SP4) and 3.2.3 (3.2 SP3).
See primus emc223955

Remove CDP or CRR from Recoverpoint

This seems like a simple task however since I always err on the side of caution I dug around on powerlink on the correct procedure to remove either CDP or CRR from a recoverpoint consistency group. After my search came up empty, I called EMC support and they stated that it is safe to just remove either CRR or CDP without any issues and here is how you can do it.


Monday, March 1, 2010

Good monitoring/alerting solution for san storage and vmware

One thing that our current monitoring solution solar winds orion was lacking was vmware and storage reporting. Solarwinds decided to fix this issue by acquiring a company called tek-tools. Right now they are two separate products however in the near future they will be fully integrated into a single pane of glass.

Below are some screenshots of the tek-tools product and they are pretty self explanitory. It can monitor and alert on the following, esx host cpu/memory/disk space etc, esx guest cpu/memory/disk space, datastore useage, datastore forecasting, san lun performance, just to name a few. Another thing that I am very pleased with the graphical information it can show me in my EMC Clarrion SAN (one thing navisphere reporting can't provide you with). This seems to do an excellent job of completing the circle for monitoring of your virtual environment and san storage, and once integrated into orion it will provide full monitoring of everything in your environment!


Thursday, February 4, 2010

Attach RDM to vsphere with Recoverpoint

If you need to attach a recoverpoint volume to a guest through RDM you MUST select physical access in recoverpoint if you don't want to shut down the guest. If you select virtual access you must power down the guest and then attach the disk.

1. enable physical access in recoverpoint
2. ensure that your esx hosts can see this lun by verifying in navisphere storage groups
3. rescan datastore
4. edit properties of the guest and add a physical disk, if you did everything correctly attach RDM should be available.
5. Select a drive letter on the windows server for this disk.


Thursday, December 3, 2009

Problem with Users running Windows Vista or windows 7 with CISCO NAC release 4.6.1

Here is a problem that my co-worker Mike Maron recently ran into along with the solution.

If you have users or guest desktops/laptops with windows vista or windows 7 installed that cannot access the network via NAC, it is due to a problem with windows User account Control. When this feature is enabled (it is by default), it doesn’t work properly because NAC requires Internet Explorer to run in elevated mode in order to release and renew IP addresses.

There are two workarounds to this issue

1. Right click IE and selecting run as administrator (this only works if the user has administrative rights to local PC) and then access the nac page. In many cases the user does not have administrative rights to the computer, so they can not run IE as admin, nor can they disabled user account control. http://www.cisco.com/en/US/docs/security/nac/appliance/release_notes/461/461rn.html#wp791975

2. There is also a way on the NAC appliance to bounce switch port via NAC instead of windows which will allow the PC to properly renew the IP address.

In OOB Management > Profiles>Port>choose profile to edit
Make sure the check box for Bounce the port based on role settings after VLAN is changed is checked off and update


Then navigate to User Management>User roles>Choose role and edit
Make sure Bounce switch Port after login ( OOB ) is enabled as well as Refresh IP after Login( OOB ) and save role .

Tuesday, October 27, 2009

Replication Manager Problem

I had an RM job that suddenly stopped working with the following error
2009 10 27 13:13:03 EMCRM01 INFO:Replica 2009 10 27 13:13:03 created from application set xxxxxxxx_db_logs, job VPMPRODDBSQLCL_no_Verify by cerbadmin.
2009 10 27 13:13:03 EMCRM01 INFO:Starting RecoverPoint checkpoint of [application set:servername_db_logs / job: servername _no_Verify] at time 2009 10 27 13:13:03.
2009 10 27 13:13:03 EMCRM01 INFO:This operation can take a long time. Please be patient.
2009 10 27 13:10:53 servername 004052 WARNING:Unable to find Invista CLI path. If Invista instances are being used, install InvCLI into the default path: C:\Program Files\EMC\INVCLI\.
2009 10 27 13:10:53 servername 000600 ERROR:Storage device S:\Microsoft SQL Server\MSSQL.1\MSSQL\DATA\MSDBData.mdf could not be located on supported arrays. Please check if there are problems communicating with the storage arrays.
2009 10 27 13:10:53 servername 026051 ERROR:processGetStorageDetails - failed to write Storage Details.
2009 10 27 13:10:53 servername 026607 ERROR:An unexpected internal error occurred: rawMessage::getSessionId - null buffer
2009 10 27 13:10:53 servername 026607 ERROR:An unexpected internal error occurred: rawMessage::getRequestId - null buffer

The workaround to resolve this error is as follows.
Go into the hosts tab of Replication manager, right click on the host you are having a problem with, and select rediscover arrays. Then execute the job again and it should complete successfully now.


Monday, October 26, 2009

Rename Netapp Filer (useful for netapp to emc migration of NAS)

The following steps are useful to rename a netapp filer, in order to preserve name space when migrating from netapp to emc. Unfortunately DFS wansn't used before I started working here, so I had 4 netapp filer names hosting CIFS shares that I had to migrate to EMC Celerra. After using rainfinity to replicate the shares from netapp to EMC, I had to perform the following steps to steal the name for the netapp and reuse it on the Celerra.

  1. Connect to the filer by \\filername\c$\etc and copy the existing rc & hosts files as rc.old & hosts.old.
  2. Open up the original hosts file and search and replace for the filers name and replace with the new name
  3. Open up the original rc file, update the following hostname
  4. Update the NetBIOS name on the filer by typing "options cifs.netbios_aliases "
  5. Run the following on the filer you are renaming "CF disable" to disable the cluster, "CIFS Terminate" to terminate the cifs service.
  6. Remove the entry for the old filer name from Active Directory users and computers and from DNS
  7. Run Cifs Setup to add the filer back into Active directory and DNS with the new name
  8. Run "CF enable" to enable the cluster.
  9. Connect to the node that you failed over to and type "CF takeover" this will cause a reboot of the filer that you renamed
  10. Once the filer that you renamed is back & you will see a message saying giveback operation is now available
  11. run "cf giveback"